
Quiet Luxury Kitchen on a Budget High-End Look for $301
- Feb 5
- 9 min read
A Quiet Luxury kitchen on a budget comes down to five changes under $350: under-cabinet LED strips at 3000K ($40), aged brass hardware to replace chrome ($4–8 per handle), matte paint on lower cabinets only in warm sage or greige ($80), cabinet surround for the fridge ($90), and clearing one counter surface permanently ($0). The brain reads kitchen quality through finish, light, and hardware not cabinet brand or square footage. Total: $301. No renovation required. The most expensive-looking kitchen I have ever seen cost less to update than a weekend trip.
I know this because it was mine. And eighteen months before the update, it looked like every other all-white apartment kitchen in a mid-range building functional, forgettable, and deeply depressing to stand in at 7am.
The transformation did not require a renovation. It did not require new cabinets, new countertops, or a contractor. It required understanding one thing: the difference between expensive and expensive-looking is almost entirely about material finish, light temperature, and hardware.
This approach aligns perfectly with the broader kitchen design trends 2026, which emphasize moving away from clinical, cold spaces toward environments that feel curated, textured, and deeply personal.

Once I understood that, I spent $301 over three weekends and ended up with a kitchen that people walk into and ask how much the renovation cost. The answer consistently surprises them.
This guide is the exact process. Everything I changed, in the order I changed it, with the specific products and the specific results.
The Quiet Luxury Kitchen on a Budget: Quick Answer
If you need the answer immediately, here are the five changes that create a Quiet Luxury kitchen at any budget:
Under-cabinet LED strips at 3000K - $40 total, transforms the room immediately
Aged brass hardware to replace chrome - $4–8 per handle, takes one afternoon
Matte paint on lower cabinets only - $80, warm sage or greige
Panel-front the fridge with a cabinet surround - $90 and a Saturday
Clear one counter surface completely and keep it empty - $0, immediate impact
Total: $301. The result: a kitchen that reads as designed rather than assembled.

Why Your Kitchen Looks Cheap And It Has Nothing to Do with the Cabinets
I spent two years thinking my kitchen looked cheap because of the cabinets. The cabinets were white. The countertop was laminate. The hardware was brushed nickel from a builder's range.
The cabinets were fine. The countertop was fine. The hardware was the problem and so was the light.
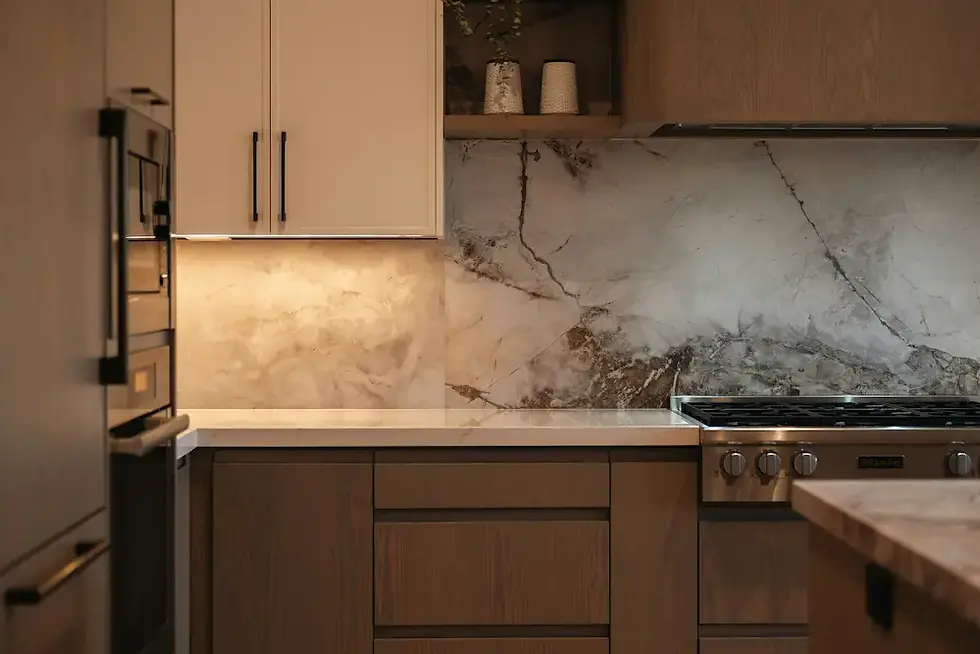
Here is what I learned: the brain reads a kitchen's quality level in approximately three seconds, and it reads it through finish, light, and hardware in that order. Not cabinet brand. Not countertop material. Not square footage.
A kitchen with matte cabinetry, warm light at 2700K, and aged brass hardware reads as expensive before the eye has processed any other detail. A kitchen with glossy cabinets, cool overhead fluorescent, and chrome pulls reads as cheap regardless of what the cabinets actually cost.
This is the Quiet Luxury hack. It is not about spending more. It is about understanding what the eye reads as quality and delivering exactly that at the lowest possible cost.

Comparison Table: High-End vs The Quiet Luxury Budget Hack
High-End Version | Cost | Budget Hack | Cost | Visual Difference |
Solid aged brass hardware | $40–80 per handle | Aged brass spray paint on existing handles | $12 for full set | Minimal at 3 feet |
Bespoke matte cabinet paint | $200+ per litre | Rust-Oleum Cabinet Transformations Greige | $80 for full lower run | None |
Under-cabinet LED system | $300+ installed | Govee LED strips with diffuser | $40 total | None |
Honed stone countertop | $3,000–8,000 | Honed stone contact paper over laminate | $35 | Visible on close inspection |
Integrated panel-front fridge | $2,000–5,000 | Cabinet Joint surround kit | $90–165 | None from 6 feet |
Zellige tile backsplash | $25–60 per sq ft | Peel-and-stick zellige-effect tile | $3–8 per sq ft | Visible on close inspection |
Custom pendant lighting | $400–1,200 | Rattan or washi pendant | $40–80 | None |

The $50 Hardware Swap: The Single Highest-Impact Change
If you do nothing else in this guide, do this.
Hardware is the detail the eye goes to first in any kitchen. A row of chrome pulls creates a horizontal line of cold, reflective metal across every cabinet front dozens of small visual interruptions that signal builder-grade, budget, and 2015 simultaneously.
Aged brass does the opposite. It absorbs light rather than reflecting it. It reads as chosen rather than standard. And in combination with warm paint tones and 2700K lighting, it shifts the entire room's register from functional to considered.
If you decide that your space needs more than just a hardware refresh, knowing the best furniture shops in the US is vital for sourcing high-quality accent pieces or seating that complement your new high-end aesthetic.
The hardware swap in three ways from lowest to highest cost:
Option 1: Spray paint existing hardware ($12–20 total)
Remove all handles and knobs
Clean with degreaser this step is non-negotiable
Prime with spray primer, two thin coats
Apply Rust-Oleum Metallic Aged Brass, two thin coats
Seal with clear matte topcoat
Reinstall after 24 hours
Option 2: Replace with budget aged brass ($4–8 per handle)
Cosmas, Amerock, and Hickory Hardware all produce aged brass at $4–8 per handle
Measure your existing hole spacing before ordering standard is 3 inches or 3.75 inches
Replace chrome screws with brass-tone screws from the same order

Option 3: Replace with solid brass ($15–35 per handle)
CB2, Rejuvenation, and Anthropologie all carry solid aged brass at this range
The visual difference from Option 2 is minimal
The tactile difference weight, warmth is significant Nina's Quick Tip: Always buy one handle first and test it against your cabinet colour in your actual kitchen light before ordering the full set. The same brass reads completely differently under 4000K overhead versus 2700K warm ambient.
Nina's note: I went with Option 2. Cosmas 4-inch center-to-center in Antique Brass, $6.49 per handle, 14 handles total: $91. The kitchen looked like a different room. I did not change a single cabinet.
Nina's $340 Budget Breakdown
Item | Product | Cost |
Hardware | Cosmas Antique Brass (14 handles) | $91 |
Paint | Rust-Oleum Cabinet Transformations Greige | $80 |
Lighting | Govee LED Strips with diffuser | $40 |
Fridge Surround | Cabinet Joint surround kit | $90 |
Total | $301 |
$39 reserve kept for touch-up paint and unexpected costs. This is what makes the budget realistic rather than theoretical.
Quiet luxury is as much about how your kitchen functions as how it looks. While you're focusing on the visual 'hacks,' it's worth considering the long-term savings of a smart-eco kitchen update because nothing feels more high-end than a space that looks designer but significantly cuts your monthly utility bills.
Stop Living in a Boring Kitchen - Free $350 Shopping List
The exact products I bought, the exact quantities, the exact order I installed them and the three things I tried that did not work so you do not waste money on them.

The Lighting Layering Hack: The $40 Change That Changes Everything
This is the change I recommend before any other. Before the hardware. Before the paint. Before anything.
The quality of light in a room determines how every surface in that room reads. The same cabinet under cool white overhead light reads as flat and cheap. The same cabinet under warm 2700K ambient plus 3000K under-cabinet task lighting reads as considered and expensive.
The two-layer kitchen lighting system:
Layer 1: Under-cabinet task lighting (3000K)
Product: Govee or Litake LED strips with diffuser channel
Position: mounted at the back of the upper cabinet underside, aimed forward
Cost: $40 total for a standard US kitchen
Layer 2: Ambient pendant lighting (2700K)
Product: rattan, washi paper, or matte ceramic pendant
Position: 26–30 inches above island or table surface
Cost: $40–80 Nina's Quick Tip: Never use 5000K bulbs in a kitchen unless you want it to look like a hospital operating room. Replace every bulb in the room with 2700K warm white before doing anything else it costs $8 and takes ten minutes.
The Cabinet Paint Hack: Transform Without Replacing
Replacing cabinets is a $5,000–25,000 project. Painting them is an $80 weekend.
The principle: paint the lower cabinets only. Upper cabinets in warm white recede. Lower cabinets in a considered colour give the kitchen its identity.
The 2026 Quiet Luxury palette for lower cabinets:
Warm sage: Benjamin Moore Saybrook Sage HC-114
Warm greige: Benjamin Moore Pale Oak OC-20
Deep putty: Benjamin Moore Camouflage 2111-40
French Blue: Benjamin Moore Newburyport Blue HC-155
The products that work:
Rust-Oleum Cabinet Transformations in Greige - $80 for a full lower run
Benjamin Moore Advance in Pale Oak OC-20 - $65–80 per litre
Sherwin-Williams Emerald Urethane - $65–85 per litre, highest durability
Nina's Quick Tip: The single most common mistake is skipping the bonding primer. Degreasing and priming are 80% of the result. The paint colour is 20%. A beautiful colour applied without proper prep will peel within six months.
Nina's note: I painted my lower cabinets Rust-Oleum Greige on a Saturday and Sunday. The kitchen looked like it had been designed. Not renovated. Designed.
The Panel-Front Hack: Make Your Fridge Disappear
A freestanding fridge is the single biggest visual interruption in most small kitchens. The solution costs $90 and a Saturday.
Option 1: Cabinet surround kit ($90–165)
Cabinet Joint and IKEA both sell surround kits
Even if you have a standard IKEA kitchen, this $90 surround kit makes it look like a custom Italian build
No tools beyond a drill and a level
Option 2: Custom panel ($150–300)
Cut a panel from the same material as your cabinets
Attach using velcro strips or command strips no drilling into the fridge
Option 3: Adhesive contact paper ($25–40)
Matte wood grain or solid colour applied to the fridge face
Best option for renters Nina's Quick Tip: Measure your fridge depth against your cabinet depth before ordering a surround kit. Most US fridges are 29–30 inches deep. Most base cabinets are 24 inches deep. The surround kit bridges this gap but only if you order the right depth.
Nina's note: Cabinet Joint's fridge surround kit, $90, installed in three hours. My kitchen immediately looked like it had been designed rather than assembled.
If replacing cabinets entirely is on your radar alongside these hacks, Stop Overpaying: Kitchen Cabinet Alternatives covers exactly where to find high-quality cabinet alternatives that match the Quiet Luxury aesthetic at a fraction of custom pricing.

Nina's Small Kitchen Hacks: 5 Changes That Cost Almost Nothing
Hack 1: Clear one surface and keep it empty ($0) The Japandi principle of ma intentional negative space. Clear one surface completely. Leave it empty. Permanently.
Hack 2: Move what is visible ($0) Move anything not used daily into a cabinet. The counter should contain only what is used every single day.
Hack 3: Replace the dish soap ($5–12)
Nina's Quick Tip: A $3 yellow dish soap bottle undoes everything around it. Replace it with a refillable ceramic or matte black dispenser. $8 at Target. This is the most embarrassing hack that consistently works.
Hack 4: Add one plant, remove two objects ($15–25) One plant in, two objects out. The rule is non-negotiable.
Hack 5: Change the dish towel ($8–15) Replace a printed dish towel with undyed linen or warm white cotton. Fold it once and drape it over the oven handle.
The Complete Order of Changes
Under-cabinet LED strips - $40 do this first
Clear one surface permanently - $0
Replace the dish soap and dish towel - $20
Hardware swap - $91
Paint lower cabinets - $80
Panel-front the fridge - $90
Add one pendant light - $40–80
Total: $301–$421 depending on options chosen.
FAQ
How do I make my kitchen look expensive on a budget in 2026?
Five changes under $350: under-cabinet LED strips at 3000K ($40), aged brass hardware ($4–8 per handle), matte paint on lower cabinets ($80), cabinet surround for the fridge ($90), and clearing one counter surface ($0). The brain reads kitchen quality through finish, light, and hardware not cabinet brand or square footage.
What is the Quiet Luxury kitchen aesthetic?
Quiet Luxury is the absence of visual noise rather than the presence of expensive materials. Matte cabinetry in warm neutrals, aged brass hardware in a single metal throughout, integrated appliances, and layered lighting at 2700K ambient plus 3000K task.
What paint colour makes a kitchen look expensive?
Warm sage Benjamin Moore Saybrook Sage HC-114 on lower cabinets with warm white on upper cabinets is the highest-impact combination for 2026. Warm greige Benjamin Moore Pale Oak OC-20 is the alternative. Both require matte finish.
Is aged brass hardware worth it?
Yes. Budget options from Cosmas or Amerock at $4–8 per handle are visually indistinguishable from solid brass at $30–50 per handle.
How do I get a high-end kitchen look without renovating?
Focus on finish, light, and hardware. Paint lower cabinets matte, replace lighting with a layered warm system, swap hardware to aged brass, panel-front the fridge, clear the counters. Total cost under $350. No structural changes required.
Love our ideas? Let's bring them into your home. WarmCazza now designs rooms like this, remotely - your own concept, layout and shopping list. Explore E-Design →
About Nina Sajaia
Nina Sajaia is the founder of WarmCazza and has been writing about interiors, slow living, and the psychology of home since 2021. She has redesigned the same 625 sq ft apartment four times. The Quiet Luxury hack she describes in this guide cost her $301 and took three weekends. She has not changed a single cabinet since.
This article was written by WarmCazza and is informed by current US furniture market research, assembly testing, and 2026 interior design trend analysis.
© WarmCazza - All Rights Reserved.


Comments